
Dependency Injection in MonoGame
In the previous article of this mini-series I talked about the problems inherent in MonoGame (and other Game Engines) that effectively prevent Dependency Injection (DI). During the development of Clean Space I made several attempts to resolve this particular issue, and in this article I want to describe the first (pretty crude) mechanism I put together.

I’ll also explore (and prove) the performance considerations of making changes like this to MonoGame, whilst contrasting this dependency injection pattern to the many service locator anti-patterns I’ve seen used as workarounds.
First World Problems
So the issue with MonoGame, and I’ll keep reiterating that it’s not limited to just MonoGame (don’t get me started on Unity), is that there are no abstractions, and many classes have inter-dependencies. That is to say that class A depends on class B, and class B depends on A. This problem very quickly rears it’s ugly head if you follow the application bootstrapping code, as demonstrated in the previous post.
Throughout this article I’ll be working exclusively with v3.7.1 of MonoGame, but the Universal Windows Platform (or ‘UWP’ for short) XAML project is much the same in the latest ‘dev’ branch if you’re inclined to be a bit more cutting edge. As such, let’s recap and explore the application startup of a UWP XAML project.
Note: ‘XAML’ stands for ‘eXtensible Application Markup Language’ and is an XML-based language designed by Microsoft to describe the visual components of your Application.
Startup (XAML)
Each platform MonoGame supports has a slightly different startup mechanism, primarily dictated by the Windows and .NET Framework calls that need to be made in order to get an application up and running. In the case of a UWP XAML application, the first bit of code to run (that we can see) is that contained in App.xaml.cs.
Whilst this class contains around 130 lines of code by default (from the project template) most of that isn’t too important with regards to Dependency Injection. The only line that really matters to us right now is:
1
rootFrame.Navigate(typeof(GamePage), e.Arguments);
Note: Whilst it might seem I’m ripping into MonoGame for their lack of DI support in this article, it’s worth mentioning that Microsoft are no better - they provide basically no DI support in UWP itself.
During startup, because nothing has been navigated to or displayed yet, the application will transition to GamePage. At this point, the code in GamePage.xaml.cs will be executed:
1
2
3
4
5
6
7
8
9
10
11
12
13
14
public sealed partial class GamePage : Page
{
  readonly Game1 _game;

  public GamePage()
  {
    this.InitializeComponent();

    // Create the game.
    var launchArguments = string.Empty;
    _game = MonoGame.Framework.XamlGame<Game1>
      .Create(launchArguments, Window.Current.CoreWindow, swapChainPanel);
  }
}
This is the first point at which MonoGame gets involved. Here we can see that it is trying to load the Game1 class into a SwapChainPanel (which the project template has declared for you in GamePage.xaml).
Before we take a look at the Game1 class, let’s have a look at the code that executes within the XamlGame<Game1>.Create method:
1
2
3
4
static public T Create(string launchParameters, CoreWindow window, SwapChainPanel swapChainPanel)
{
    return Create(() => new T(), launchParameters, window, swapChainPanel);
}
This version of the Create method was actually introduced by Francesco Bonizzi in October 2018. This greatly simplifies (though doesn’t solve) our DI considerations when compared to earlier versions. You see, whilst by default your Game class will be instantiated with new T(), we can see that there is an overloaded method of the Create method which accepts a Func<T>.
1
2
3
4
5
6
7
8
9
10
11
12
13
14
15
16
17
18
19
20
21
22
23
24
static public T Create(Func<T> gameConstructor, string launchParameters, CoreWindow window, SwapChainPanel swapChainPanel)
{
  //argument validation...

  // Save any launch parameters to be parsed by the platform.
  UAPGamePlatform.LaunchParameters = launchParameters;

  // Setup the window class.
  UAPGameWindow.Instance.Initialize(window, swapChainPanel, UAPGamePlatform.TouchQueue);

  // Construct the game.
  var game = gameConstructor();

  // Set the swap chain panel on the graphics mananger.
  if (game.graphicsDeviceManager == null)
      throw new NullReferenceException("You must create the GraphicsDeviceManager in the Game constructor!");
  game.graphicsDeviceManager.SwapChainPanel = swapChainPanel;

  // Start running the game.
  game.Run(GameRunBehavior.Asynchronous);

  // Return the created game object.
  return game;
}
There’s a lot more happening here than everything else we’ve seen so far. We can ignore the argument validation (excluded for brevity above) and jump straight to UAPGamePlatform and UAPGamePlatform. ‘UAP’ is short for Universal Apps which is what we called ‘UWP’ a few years ago when the concept was first introduced. The classes in question actually belong to the XNA namespace (not MonoGame) which is a game framework Microsoft stopped developing several years ago before the MonoGame community picked up the reins.
Note: ‘XNA’ is not an acronym. Greg Duncan explained that if anything, ‘XNA’ stands for ‘XNA’s not acronymed’…
…but at least it’s one less acronym from Microsoft to try and remember.

The Initialize method on the UAPGameWindow class is also very involving, not to mention internal so is otherwise not visible to us.
Once the XNA components are configured, MonoGame goes on to instantiate our Game1 class (passed as a generic T), then complain (by throwing an exception) if you don’t set the graphicsDeviceManager property (which is also internal…) before calling the public Run method on the inherited Game class. Remember this bit because it’ll become important later.
The reason I keep highlighting these internal members is it means, unless we’re writing code in the same assembly as MonoGame, or MonoGame for some reason exposes it’s internal members to our code using an InternalsVisibleTo attribute, we can only access those classes via reflection, and doing so would not be type safe. This is a huge problem with regards to extensibility because it makes it either impossible or very unsafe to extend and change behaviours.
Interdependencies
Of the last block of code we looked at, the biggest problem by far is interactions with the graphicsDeviceManager property on the Game class. The property looks as follows:
1
2
3
4
5
6
7
8
9
10
11
12
13
14
15
16
17
18
internal GraphicsDeviceManager graphicsDeviceManager
{
    get
    {
        if (_graphicsDeviceManager == null)
        {
            _graphicsDeviceManager = (IGraphicsDeviceManager)
                Services.GetService(typeof(IGraphicsDeviceManager));
        }
        return (GraphicsDeviceManager)_graphicsDeviceManager;
    }
    set
    {
        if (_graphicsDeviceManager != null)
            throw new InvalidOperationException("GraphicsDeviceManager already registered for this Game object");
        _graphicsDeviceManager = value;
    }
}
There seems to be some sort of in-joke about setting important fields as internal and not making them virtual, but I understand that this property is so intrinsic to other code in MonoGame that they wanted to protect it. We can see from the getter that if the private field _graphicsDeviceManager is null then it will populate the field using Services.
We haven’t talked about this Services property yet but we’ll circle back to it later. We can also see from the setter that if we make the mistake of attempting to set the graphicsDeviceManager property twice, we’ll get an InvalidOperationException.
With that all in mind, let’s take a look at this GraphicDeviceManager class, and in particular, it’s constructor:
1
2
3
4
5
6
7
8
9
10
11
12
13
14
15
16
17
18
19
public GraphicsDeviceManager(Game game)
{
    if (game == null)
        throw new ArgumentNullException("game", "Game cannot be null.");

    _game = game;

    // sets a load of graphics properties which I'll omit

    // Let the plaform optionally overload construction defaults.
    PlatformConstruct();

    if (_game.Services.GetService(typeof(IGraphicsDeviceManager)) != null)
        throw new ArgumentException("A graphics device manager is already registered.  The graphics device manager cannot be changed once it is set.");
    _game.graphicsDeviceManager = this;

    _game.Services.AddService(typeof(IGraphicsDeviceManager), this);
    _game.Services.AddService(typeof(IGraphicsDeviceService), this);
}
If you scroll up to the previous chapter, you may recall that graphicsDeviceManager was a property on the Game class (I told you that bit was important). During our exploration of the Create method we saw that if you don’t set that property when constructing your Game then it will throw an exception. Here’s a mini-recap:
1
2
3
4
5
6
// Construct the game.
var game = gameConstructor();

// Set the swap chain panel on the graphics mananger.
if (game.graphicsDeviceManager == null)
    throw new NullReferenceException("You must create the GraphicsDeviceManager in the Game constructor!");
For those with experience with DI containers, you’ll immediately see the issue here. In order to construct a Game, we must create GraphicsDeviceManager, but in order to construct a GraphicsDeviceManager, we must create a Game. Depending on the DI container you use, you’ll either end up with a StackOverflowException as the container loops around playing hot-potato with these constructors, or the container will realise that neither class can be instantiated and throw an exception accordingly.
Submodules
There are a number of approaches to tackling the above problems (and other problems we haven’t discovered yet), but the first one I’ve opted for here is to use a git submodule to pull in the MonoGame source code, have my project reference the submodule, and then hack away at it until things are working.
Note: I don’t want to spend time explaining submodules and how to work with them, so if it’s a concept you’re not familiar or comfortable with, I recommend checking out a tutorial and then heading back here afterwards.
Before I get started on this approach though, I want to say that this is a bad idea. By submoduling the MonoGame repository I’m introducing a fork that I then become responsible for maintaining (like applying the latest commits from the parent). On a large active repository like MonoGame, it really isn’t very workable. However, it is a useful mechanism for exploring problems with frameworks you depend on.
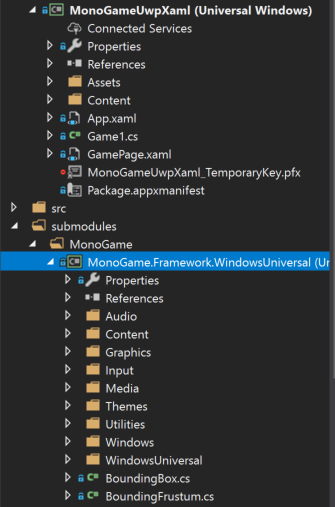
Per the MonoGame README, once you’ve initialised the MonoGame submodule and in turn, MonoGame’s submodules, you can run Protobuild.exe to generate the necessary csproj’s. Protobuild will generate a MonoGame.Framework.WindowsUniversal.csproj in the MonoGame.Framework directory, which we can add to our solution as an existing project:
Note: Once you’ve submoduled MonoGame, create yourself a branch at the v3.7.1 tag and checkout there, otherwise you’ll default to the
developbranch which has been set as the default.
With the MonoGame source code now available, drop the assembly reference to MonoGame.Framework in your own application, and add a project reference to MonoGame.Framework.WindowsUniversal in it’s place. Your application should still build and be able to execute (though in my case I do get a bunch of build warnings from the MonoGame project which I’ll ignore).
Whilst that seems like a lot of work to have achieved nothing, what it actually means is that we can now edit the MonoGame code and see that reflected immediately in our own application. Given the power and authority to change MonoGame code, the next sections outline the changes I would make in order to better support dependency injection.
Initialisation
You may remember from my previous post there’s actually two aspects of dependency injection I would like to improve. The first is constructor injection for my Game class during initialisation (when the game first loads, or perhaps resumes from sleeping in some cases). The second case was scoped convention injection during each iteration of the loop (each time the Update method is called).
The two mechanisms are very different so we’ll tackle each in turn. Whenever you make a change to an application, there are several things you need to take into account, one of which is performance. I could spend time benchmarking application initialisation times before and after my changes, but the fact is, if your game reads any file (textures, sprites, audio clips, etc) or pops out to the internet, which is very likely when you’re loading a game, the minuscule amount of time it takes to run dependency injection by comparison makes it a complete non-entity. As such, I’m not even going to consider performance for game initialisation. However, when we look at interfering with the update loop, which runs very often and needs to execute very quickly, we’ll definitely spend some time benchmarking.
When following the startup code, we saw that the execution flow is roughly:
App.xaml.cs → GamePage.xaml.cs → Game1.cs → GraphicsDeviceManager.cs
As we discovered above, the GraphicsDeviceManager requires a reference to Game1. Normally, this would be a good thing. We call it dependency inversion, however the two classes are very strongly-coupled.
For Application Initialisation it’s actually pretty simple to hook in a DI container if we accept the caveat that the constructor for Game1 must always instantiate the GraphicsDeviceManager. To prove this, let’s install the Microsoft.Extensions.DependencyInjection NuGet package.
Note: In order to install this package, per the NetStandard Compatibility Documentation, you need to ensure your minimum UWP target is the Falls Creators Update (Windows 10.0 Build 16299).
Once installed, modify GamePage.xaml.cs to read as follows:
1
2
3
4
5
6
7
8
9
10
11
12
13
14
15
16
17
18
19
20
21
22
23
24
25
26
27
28
29
public GamePage()
{
    this.InitializeComponent();

    // Create the game.
    var launchArguments = string.Empty;

    // create an MS service collection
    var services = new ServiceCollection();
    // add our game class
    services.AddSingleton<Game1>();
    // Our game class creates the GraphicsDeviceManager, which in turn adds itself to the Game.Services property
    // we can peal those services back out by fetching our singleton Game1 instance:
    services.AddSingleton(provider => provider
        .GetRequiredService<Game1>()
        .Services
            .GetService<IGraphicsDeviceManager>());
    services.AddSingleton(provider => provider
        .GetRequiredService<Game1>()
        .Services
            .GetService<IGraphicsDeviceService>());

    // add your custom services here...

    // build a microsoft di container
    var serviceProvider = services.BuildServiceProvider();
     // pass a delegate of our di container to the Create method overload
    _game = MonoGame.Framework.XamlGame<Game1>.Create(serviceProvider.GetRequiredService<Game1>, launchArguments, Window.Current.CoreWindow, swapChainPanel);
}
Hopefully the code comments cover the basics in that snippet. We can confirm this works by adding a dependency to our Game1 constructor:
1
2
3
4
5
6
7
8
public Game1(Foo foo)
{
    _foo = foo;

    // this line must be kept despite the DI, sorry!
    graphics = new GraphicsDeviceManager(this);
    Content.RootDirectory = "Content";
}
Then add a Foo implementation to our DI container in the GamePage.xaml.cs class prior to the DI container being created:
1
2
// add your custom services here...
services.AddSingleton<Foo>();
But wait, we now have an error in this class. The generic on the XamlGame class is declared as where T : Game, new().
Well, if you’re only after a hacky application initialisation, you can update the constructors on Game1 to be as follows:
1
2
3
4
5
6
7
8
9
10
11
// this entire ctor must be kept despite the DI, sorry!
public Game1()
{
    graphics = new GraphicsDeviceManager(this);
    Content.RootDirectory = "Content";
}

public Game1(Foo foo) : this()
{
    _foo = foo;
}
Because we must have a public parameterless constructor to keep XamlGame happy, I’ve moved the default instantiation code into it. We can then have a constructor of our choosing (such as the one taking a Foo in the example above) so long as it calls the default constructor (which I’m doing above with the this() instruction).
If you run the above code you’ll see that the constructor that takes a Foo is called first, which in turn immediately calls the default constructor. It’s not pretty, but unless we’re prepared to get our hands real dirty (per the next blog post in this series!!) then that’s the best you can manage.
Summary
This has been a really long post for what amounts to a very sub-par solution, and that’s ignoring the fact that we’ve only tackled the much easier application initialisation aspect. However, it’s all a learning process and we now have all the pieces in place to enact some real change and improve this solution.
There are a minimum of 3 more articles to this series (one of which I’ve already started writing up). I’ve come up with a fairly dirty way of improving on this DI mechanism that hopefully doesn’t involve needing to make changes to MonoGame itself. Then I’ll explore modifying MonoGame (and hopefully look into pushing some changes back upstream) for Application Initialisation, and a final article on heavily modifying the engine in order to support the scoped update loop injection that I mentioned previously. As you can see, despite the length of this blog post, the journey has but begun…
As an aside, it took me almost a whole year to write the second article in this mini-series, and even then I only picked it up because someone showed interest on Twitter (thanks @Osoy13 for your tweet). If this series interests you please drop me a note below or on twitter - it makes a big difference to my motivation to blog more!